Getting a great DIY result on a wood stain project doesn't have to be rocket science. But it does take a little planning on the front end. There's more to staining wood than brushing on the stain and sealing it. If you've got a woodworking project that you're anxious to stain, here's what you'll need to know to get the best results.
Wood Stain Tip #1: Choose the Right Stain
All wood stains aren't the same, but most work on any species of wood. Here are the most important features of water-based and oil-based, to help you make your choice.
Water Based Wood Stain
- Pros – soaks in and dries fast; compatible with water- or oil-based sealer; great for light-use projects such as tables and picture frames; and low VOC (Read: VOCs – Volatile Organic Compounds).
- Cons – can streak if it dries too fast.
Oil Based Wood Stain
- Pros – can penetrate deeply; great for heavy-use projects such as floors.
- Cons – longer working time; must have oil-based sealer.
A third, less known choice is gel stain. There is controversy about gel stain but for non-porous wood and non-wood surfaces, there are definitely benefits. To learn more about gel stain pros and cons, read WoodMagazine.com's article.

Wood Stain Tip #2: Choose Your Method
There are two common ways to apply wood stain. One is by brushing or rolling it on, and the other is by wiping.
Brushing or rolling floods the wood with stain, allowing it to soak in as deeply as possible. One downside is that it can raise the wood grain significantly, which means extra steps and possibly additional staining.
To wipe on stain, use a rag dampened with the liquid or gel, and rub it into the grain using a bit of force. With flooding, you'll need to wipe off the excess. With wiping on the stain, it's a one-step process that leaves no excess.

Wood Stain Tip #3: Prep the Wood
Every species of wood accepts stain differently. To get the most even results, you'll need to sand several times, and then condition the wood. Always sand in the direction that the grain runs, not across it. Start with a coarser sandpaper, such as #120-grit, and gradually work your way to finer and finer grits. The higher the number, the finer the grit.
Once you've finished sanding, you'll need dust the wood off with a tack cloth. Next you may want to apply a wood sealer to help the stain soak in more evenly. Pine is especially prone to splotches if it's not conditioned. This Old House recommends letting conditioner sit for about 15 minutes.

Wood Stain Tip #4: Stain and Remove the Excess
If you've decided to brush or roll, work in long, even strokes and gradually lift the applicator toward the end of each stroke. That's called “feathering,” and helps avoid demarcation lines. After oil-based stain sits on the wood for about 10 minutes, wipe it off using a clean rag.
With water-based stain, check the stain label for the right timing. If you're wiping, soak the rag and squeeze out the excess. Work in the stain using long strokes, as if you were cleaning it. There's no need to wipe it down again later.
Wood Stain Tip #6: Seal the Wood
Oil-based urethane and its cousin, spar urethane, are ideal for floors and come in glossy or satin finishes. Water-based urethane is serviceable for lighter use projects, but requires regular sanding and re-coating if used on floors. (Read: Refinishing Wood Floors Isn't Easy) Use a fine bristle brush and long, even strokes or a foam roller and slow strokes to avoid bubbles. For wiping, soak a lambswool applicator in sealer, then drag it slowly across the surface. After it dries, you can lightly sand using fine-grit sandpaper and apply more.
The key to getting a great wood stain result isn't a particular brand of stain or sealer. What's important is using the right product for the purpose, prepping the wood beforehand, and applying stain and sealer the right way.

Creative Designs for Wood Stain
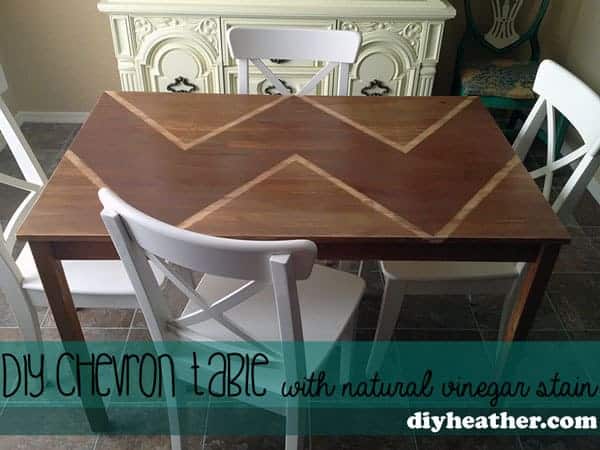
There's no rule that says you can only use one stain color on a piece of furniture, so get creative. Here's a lovely stained table that blogger Heather Rode shared, with step-by-step instructions too. Once you finish, your wood stain project, we'd love to see the results and hear about your experiences!
We've got lots more painting tips, including my favorite painting tools. If you've got other questions, share them below and we'll give you simple answers you can use for the perfect stain (or painting) project.
- Paint Colors and Lighting
- How Many Types of Paint Finishes Are There?
- Calculating How Much Paint to Buy
- How to Clean Paint Brushes, Part 1 and … Cleaning Paint Brushes, Part 2
- How to Safely Dispose of Paint
- Tack Cloth (or Tack Rag)


Leave a Reply