


You finally decided to buy an artificial Christmas tree. Now the box is waiting for you to open it and you're a little nervous. You're finding it hard to imagine how that skinny, square box will turn into a beautiful round Christmas tree.
That's where I was a week ago. King of Christmas offered me a tree of my choice in exchange for sharing my experience on social media. With 9 ft ceilings, my big decision was how tall a tree to get because I move every few years. Finally decided on the 8′ Tribeca Spruce Blue Artificial Christmas Tree with 650 Warm White LED Lights (available as 7 or 8 ft, unlit or pre-lit).
Now that my tree is fluffed and shaped, it's time to get decorating. Here are the steps I went through to unbox, assemble and turn skinny tree branches into a beautiful and very full Christmas tree.
Steps to Create the Perfect Tree

Unboxing an Artificial Christmas Tree
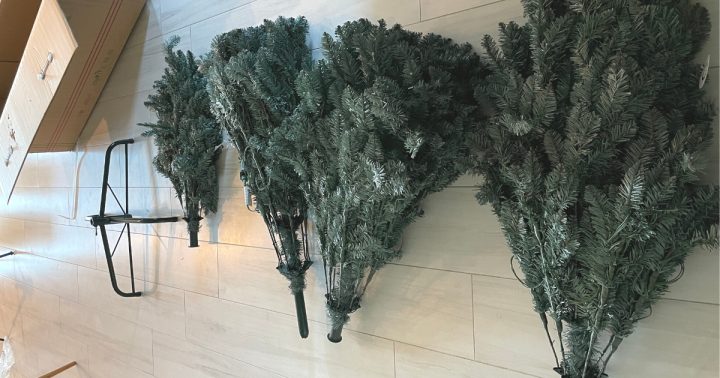
The box was big, heavy and surprisingly easy to unpack. Once you start taking the tree sections out of the box, you realize they're very easy to manage. At the bottom of each trunk section is a round protective cap for safety (save these for storing your tree).
The number of tree sections will vary based on the size of your tree. Here's what I found in the box:
- Protective bubble wrap on top of the tree.
- Four sections for my 8 ft King of Christmas, Tribeca Spruce Blue Artificial Christmas Tree with 650 Warm White LED Lights.
- Folded tree stand which takes a minute to spread out.
- Instructions, gloves which I didn't use and a large storage bag with handles.
You won't need many tools for this project. I used a utility knife to cut the straps on the box. Later I sat on a folding step stool while fluffing the lower branches and then a lightweight step ladder (this is one of my favorite tools).
How to Assemble an Artificial Christmas Tree
Assembly of this artificial Christmas tree was incredibly easy, taking maybe 10 minutes. What I found most incredible is once the tree was put together, all you have to do is plug it in … and magically, the entire tree lights up. This is sooooooooo much easier than stringing lights on a real Christmas tree.

Here are the steps taken to assemble my tree:
- Read directions and grateful there were only 4 pages.
- Extended the tree stand.
- Found the bottom section (labeled A), removed the end cap and inserted the trunk into the stand. Then secured the trunk by tightening the screw.

- Followed the same steps for sections B, C and D. Each section easily slips into the trunk below and there are no additional screws.
- Plugged the tree in to verify that all lights were working. Unplugged the tree for the next step as a safety precaution.
Artificial Christmas Trees Need Fluffing
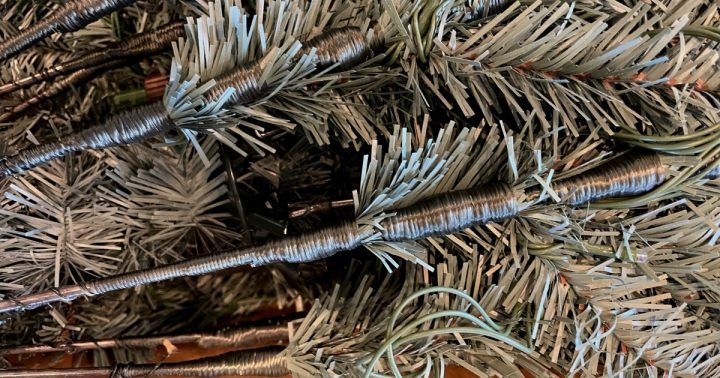
Fluffing is where you'll spend most of your time if you want your artificial Christmas tree to look beautiful. Fluffing is the step where you separate the individual branches from the tree trunk. You need to spread the branches out to resemble a real tree … and fill in the space so there aren't any gaps.

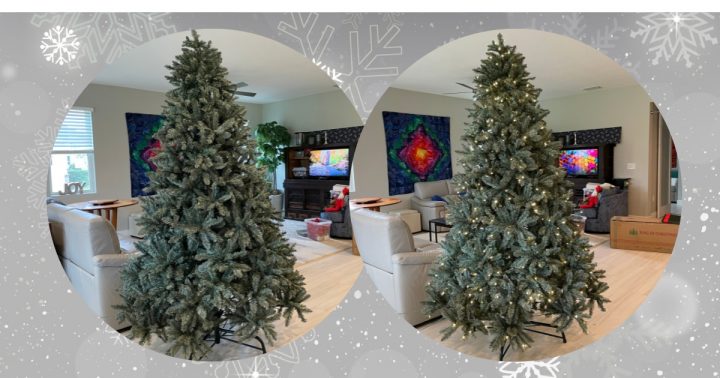
In the photo above, you can't see through the lower half because the branches have been fluffed out. The top of the tree is waiting to be fluffed and I'm planning to make a vide of this.
Being new to artificial Christmas trees, I started by fluffing a quarter of the two lower sections. I wanted to see the results of a newbie and learn what I had to do differently. Here's what worked for me … and you'll find an approach that works for you.

Starting at the back of the large branches, you want to separate the small branches. Working your way from the center to the outside of the tree, you'll have enough small branches to create one to 3 or more stars, one in front of the other to the outside.
Here's how I did this:
- Point one branch to the left 45 degrees, the next straight up and another 45 degrees to the right.
- For the next star, follow the same pattern – left, right and either up or down … adjusting the placement of the branches to fill in gaps in the star behind it.
- When you get to the outside of the tree, the branches should almost look like a flower opening up (below).

Fluffing large artificial Christmas trees takes time, a lot of time! Give yourself a few days to finish the task or a better idea, invite one or 2 friends over and have a fluffing party which I plan to do next time although it shouldn't take as long.

Adjusting Tree Shape & Pre-lit Lights
Once you've finished fluffing your tree, you'll probably want to go back and make some adjustments. You may also discover that you started filling in the gaps as you went along.
With my King of Christmas tree, I was happy with the shape of the tree and only filled in a few gaps. There were a few instances where I also shifted branches to spread the LED lights out more evenly … that's all.


Leave a Reply